May 292020Even the newest Matlab 2020a requires GCC 6.3 from 2016 to compile custom MEX functions in C++. That is quite a problem in modern Ubuntu (based) distros, which do not have this version of GCC in the repository and also compiling the GCC 6.3 does not work smoothly because of different version of Glib and such.
I am using Linux Mint 19.3 Tricia based on Ubuntu 18.04 Bionic Beaver, so this is what I tried and successfully managed to get it working.
Virtualization to the rescue
Inside Virtualbox I have installed 64bit Ubuntu 16.04.6 Xenial. It might ask after installation to upgrade, don’t do it… https://releases.ubuntu.com/16.04/
I had no luck installing gcc-6.3 from a PPA, so I decided to compile it from the sources:
https://ftp.gnu.org/gnu/gcc/gcc-6.3.0/gcc-6.3.0.tar.bz2
You need packages: build-essential, libgmp-dev, libmpfr-dev, libmpc-dev:
sudo apt install build-essential libgmp-dev libmpfr-dev libmpc-dev
extract the tar.bz2 and inside the directory, create a build directory:
mkdir build
cd build
../configure --enable-languages=c,c++ \
             --disable-multilib \
             --program-suffix=-6.3
make -j 8 # change the number according to your virtual CPU core count
Back to the main system
Copy the whole gcc folder (you can use mounting a local folder from host) to the host system.
Also copy from /usr/lib/x86_64-linux-gnu/ the files libmpfr.so.4 and libmpfr.so.4.1.4 to host system. Other libraries were compatible in my case, you might need to copy also libgmp and libmpc shared objects if versions differ.
In the build directory run:
sudo make install
It shoud work now as gcc-6.3 !
With matlab mex inside Matlab
mex GCC='/usr/local/bin/gcc-6.3' arrayProduct.cpp
With a Makefile
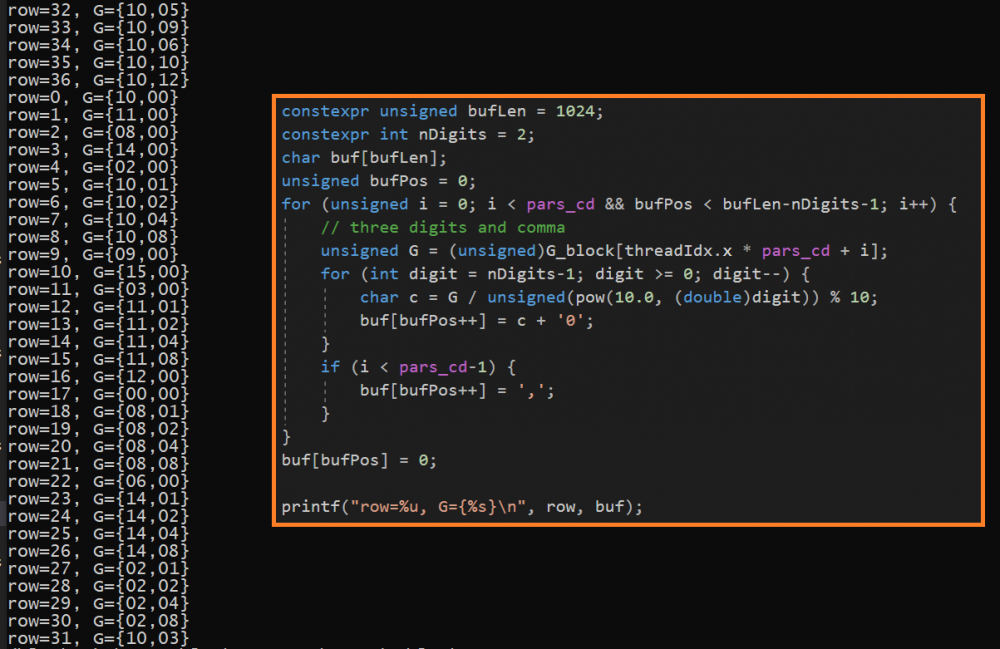
In my case I need to use NVIDIA’s nvcc, so I use a Makefile to compile everything like this:
SRC = ../src
SRC_MEX = ../src_mex
NVCC_FLAGS = -std c++14 -Xcompiler -std=c++14 -Xcompiler -Wall
DEPLOY_MEX = ../deploy_mex

all: test_hc12 test_hc12_taboo mex

MATLAB_INCLUDE = -I/usr/local/MATLAB/R2019b/extern/include
MATLAB_LIBS = /usr/local/MATLAB/R2019b/sys/os/glnxa64/libstdc++.so.6 -pthread \
   -Wl,--no-undefined -shared -Wl,--as-needed \
   -Wl,-rpath-link,/usr/local/MATLAB/R2019b/bin/glnxa64 \
   -L"/usr/local/MATLAB/R2019b/bin/glnxa64" \
   -Wl,-rpath-link,/usr/local/MATLAB/R2019b/extern/bin/glnxa64 \
   -L"/usr/local/MATLAB/R2019b/extern/bin/glnxa64" \
   -lMatlabDataArray -lmx -lmex -lmat -lm -lstdc++ \
   -Wl,--version-script,"/usr/local/MATLAB/R2019b/extern/lib/glnxa64/mexFunction.map"
MATLAB_NV_LIBS = -L/usr/local/cuda/lib64 -lcudart
MATLAB_NVCC_FLAGS = -Xcompiler -fexceptions \
  -Xcompiler -fPIC \
  -Xcompiler -fno-omit-frame-pointer \
  -Xcompiler -pthread -Xcompiler -O2 \
  -Xcompiler -fwrapv -Xcompiler -DNDEBUG \
  -Xcompiler -D_GNU_SOURCE -Xcompiler -DMATLAB_MEX_FILE

mex_function.o: $(SRC_MEX)/mex_function.cu
  nvcc -ccbin gcc-6.3 -v -c $(SRC_MEX)/mex_function.cu \
       -o mex_function.o $(MATLAB_INCLUDE) $(MATLAB_NVCC_FLAGS)

mex: mex_function.o
 g++-6.3 mex_function.o -o hc12qs2_v2.mexa64 \
         $(MATLAB_LIBS) $(MATLAB_NV_LIBS) \
 && cp hc12qs2_v2.mexa64 $(DEPLOY_MEX)

test_hc12: $(SRC)/test_hc12.cu
 nvcc -ccbin gcc-6.3 -v $(SRC)/test_hc12.cu \
      -o test_hc12 $(NVCC_FLAGS)

test_hc12_taboo: $(SRC)/test_hc12_taboo.cu
 nvcc -ccbin gcc-6.3 -v $(SRC)/test_hc12_taboo.cu \
      -o test_hc12_taboo $(NVCC_FLAGS)

.PHONY: clean
clean:
 rm -f test_hc12 test_hc12_taboo hc12qs2_v2.mexa64 mex_function.o

rebuild: clean all
Apr 032019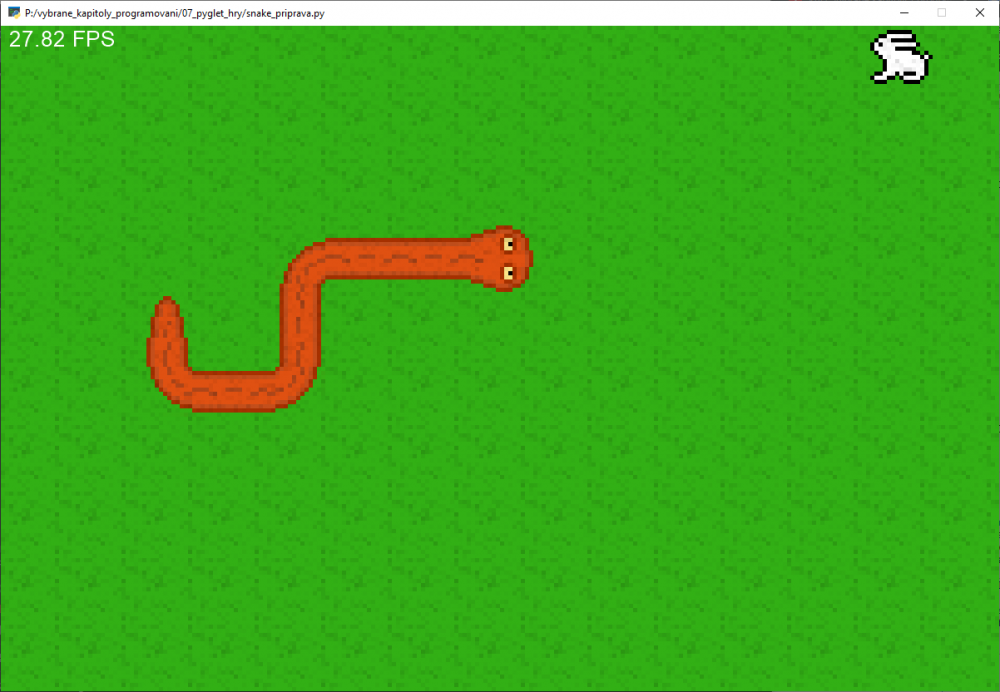
As part of an voluntary introductory course the students and me made the decision to create a game. They have only one programming course in Matlab, studying mechanical engineering. The whole effort took two and half lectures, but the result was worth it and I hope students have learned something that will be regarded as a valuable experience.
What library to use? Setup environment. Example.
Pyglet, because I like responsive applications, I want to be able to scale and rotate sprites. Also the installation was easy. Students do not have permission to install software, therefore we created a virtualenv. Another totally new thing for them. Using PyCharm really helps, most students are not comfortable with using a shell.
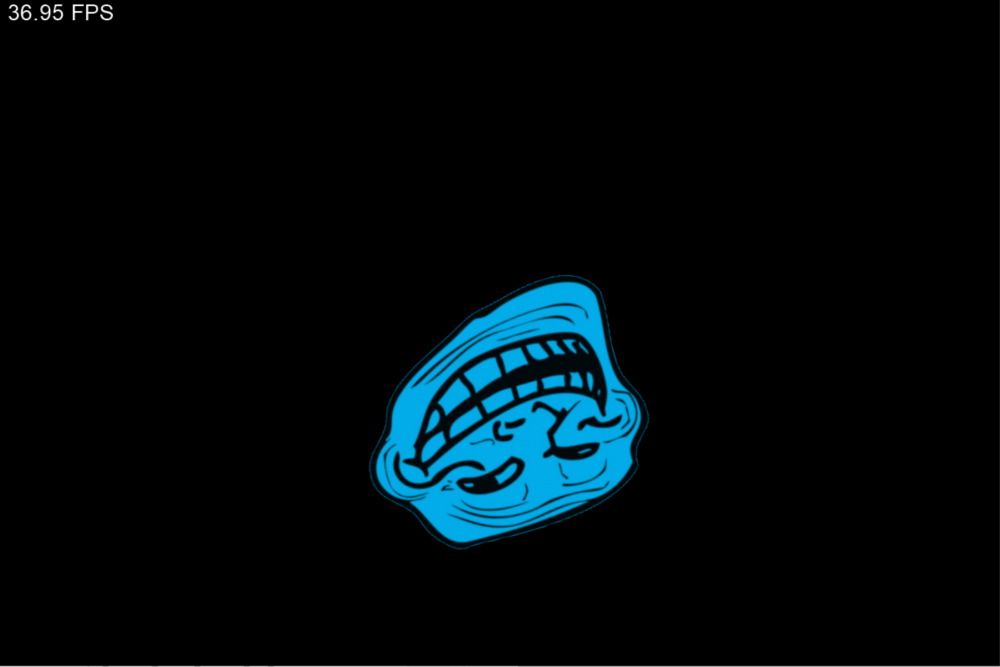
As example application I have prepared a rotating trollface which moved unexpectedly when user hit arrow keys. Example involved loading a PNG image with alpha channel, handling on_draw and on_key_press, scheduling periodical update, and drawing text label with computing FPS. Then we played around with the code a little, changing colours of the trollface randomly when moved, then adding sine waves to the colors depending on time.
So we need only things from pyglet and random.
import pyglet
from pyglet.window import key, mouse
from pyglet.gl import *
import random
Graphics + sound = assets
No blocky quiet boring snake this time! So after some searching the web I found:
OpenGameArt.org Snake sprites & sound
Now this proved to be quite a challange for our first year students. I might swamped them a little with all this – cutting out sprites from one file, sound and the snake has nice turn sprites.
We had a problem with sprites having black borders when we scaled them. I knew setting GL_NEAREST shoud do the trick. After pyglet.texture.Texture constructor mislead me a little, the solution have been found. Just put glTexParameteri(GL_TEXTURE_2D, GL_TEXTURE_MAG_FILTER, GL_NEAREST) in on_show event handler.
Application structure
The game_state object of SnakeGame class have all the need methods, holds a window and reacts to user input. on_show only sets the magnifying filter for textures to nearest neighbor.
class SnakeGame:
    def __init__(self):
        pass

    def reset_snake(self):
        pass

    def place_rabbit(self, r=None, c=None):
        pass

    def update(self, dt):
        pass

    def on_show(self):
	glTexParameteri(GL_TEXTURE_2D,
                        GL_TEXTURE_MAG_FILTER,
                        GL_NEAREST)

    def on_key_press(self, symbol, modifiers):
        pass

    def on_mouse_press(self, x, y, b, mod):
        pass

game_state = SnakeGame()  # gamestate with window

pyglet.app.run()  # run main event loop
Initialize everything
First we create a window and register SnakeGame methods as handlers for the window’s events. Then we set periodical update (the interval is not guaranteed to be exactly 1/60 s). Also we setup labels to display frames per second and length of the snake and load sound. __init__ method looks like this:
self.frame_counter = 0 # for FPS label
self.one_second_counter = 0 # for FPS label

# pyglet objects
self.main_window = pyglet.window.Window(1200, 800)

self.main_window.push_handlers(self.on_key_press,
                               self.on_draw,
                               self.on_show,
                               self.on_mouse_press)

pyglet.clock.schedule_interval(self.update, 1 / 60)

self.fps_label = pyglet.text.Label('??? FPS',
                                   font_name='Arial',
                                   font_size=20,
                                   x=10, y=self.main_window.height,
                                   anchor_x='left', anchor_y='top')

self.len_label = pyglet.text.Label('Length',
                                   font_name='Arial',
                                   font_size=20,
                                   x=10, y=self.main_window.height-35,
                                   anchor_x='left', anchor_y='top')
# sound
self.eat_sound = pyglet.media.load('data/eat.wav', streaming=False)
self.die_sound = pyglet.media.load('data/die.wav', streaming=False)
The graphics is in one PNG file which we will cut with get_region method. Also we set a zoom (scale factor) and compute how many sprites we can cram into our window and prepare background (not bothering with batch drawing which pyglet supports).
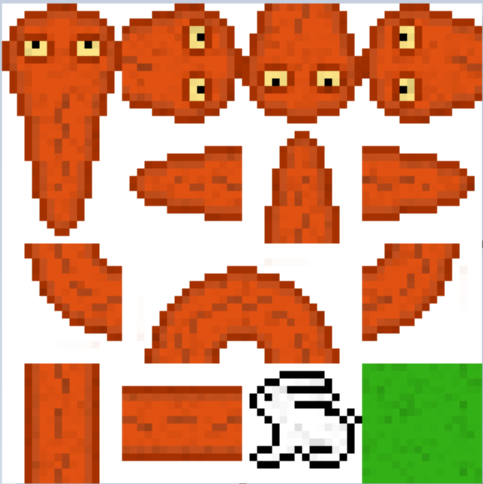
# graphics
snake_png = pyglet.resource.image("data/Snake.png")

s_w = self.snake_png.width // 4
s_h = self.snake_png.height // 4

self.images = {
    'head_up': snake_png.get_region(0, 3*s_h, s_w, s_h),
    'head_right': snake_png.get_region(s_w, 3*s_h, s_w, s_h),
    'head_down': snake_png.get_region(2*s_w, 3 * s_h, s_w, s_h),
    'head_left': snake_png.get_region(3*s_w, 3 * s_h, s_w, s_h),
    'tail_up': snake_png.get_region(0, 2 * s_h, s_w, s_h),
    'tail_right': snake_png.get_region(s_w, 2 * s_h, s_w, s_h),
    'tail_down': snake_png.get_region(2 * s_w, 2 * s_h, s_w, s_h),
    'tail_left': snake_png.get_region(3 * s_w, 2 * s_h, s_w, s_h),
    'turn_1': snake_png.get_region(0, 1 * s_h, s_w, s_h),
    'turn_2': snake_png.get_region(s_w, 1 * s_h, s_w, s_h),
    'turn_3': snake_png.get_region(2 * s_w, 1 * s_h, s_w, s_h),
    'turn_4': snake_png.get_region(3 * s_w, 1 * s_h, s_w, s_h),
    'vertical': snake_png.get_region(0, 0, s_w, s_h),
    'horizontal': snake_png.get_region(s_w, 0, s_w, s_h),
    'rabbit': snake_png.get_region(2 * s_w, 0, s_w, s_h),
    'grass': snake_png.get_region(3 * s_w, 0, s_w, s_h),
}

self.sprite_zoom = 5
self.columns = self.main_window.width // (self.sprite_zoom * s_w)
self.rows = self.main_window.height // (self.sprite_zoom * s_h)
self.sprite_w = s_w
self.sprite_h = s_h

self.background_sprites = []
for i in range(self.columns):
    for j in range(self.rows):
        sprite = pyglet.sprite.Sprite(self.images['grass'])
        sprite.scale = self.sprite_zoom
        sprite.position = (i * s_w * self.sprite_zoom,
                           j * s_h * self.sprite_zoom)
        self.background_sprites.append(sprite)
We store snake parts in a list, where index 0 is head and last index is tail. Every snake part is a tuple (row, col, direction, sprite). We also exploit that tuple being immutable, image of the sprite can still be changed. I do consider using immutable types where possible a good practice of defensive programming. Rabbit is a list, because we want to change it’s row and column placement.
self.snake = []  # parts of snake (list)
self.snake_dir = 'right'  # current direction of snake
self.snake_dir_next = 'right'  # direction where snake moves
self.reset_snake()

self.snake_move_t = 0.2  # interval of snake move
# current remaining time until snake moves
self.snake_move_t_rem = self.snake_move_t

self.rabbit = [0, 0, pyglet.sprite.Sprite(self.images['rabbit'])]
self.rabbit[2].scale = self.sprite_zoom
self.place_rabbit()
At the beginning of each game, we reset the snake speed and place a snake of length 3 into upper bottom third of the screen, facing right.
def reset_snake(self):
    self.snake_move_t = 0.2

    self.snake.clear()  # delete old snake
    row = self.rows // 3      # head position - row
    col = self.columns // 3   # head position - column
    head_sprite = pyglet.sprite.Sprite(self.images['head_right'])
    head_sprite.scale = self.sprite_zoom
    head_sprite.position = (col * self.sprite_w * self.sprite_zoom,
                            row * self.sprite_h * self.sprite_zoom)

    body_sprite = pyglet.sprite.Sprite(self.images['horizontal'])
    body_sprite.scale = self.sprite_zoom
    body_sprite.position = ((col-1) * self.sprite_w * self.sprite_zoom,
                            row * self.sprite_h * self.sprite_zoom)

    tail_sprite = pyglet.sprite.Sprite(self.images['tail_right'])
    tail_sprite.scale = self.sprite_zoom
    tail_sprite.position = ((col-2) * self.sprite_w * self.sprite_zoom,
                            row * self.sprite_h * self.sprite_zoom)

    self.snake.append((row, col, 'right', head_sprite))
    self.snake.append((row, col-1, 'right', body_sprite))
    self.snake.append((row, col-2, 'right', tail_sprite))

    self.snake_dir = 'right'
    self.snake_dir_next = 'right'
Then we need to place the rabbit. Here I wanted to show sets, so we create a set A of all possible positions and set S of snake positions. Therefore A ∖ S is a set of free positions where we can place the rabbit. We also leave the caller option to assign the position with arguments r, c (for our mouse cheat).
def place_rabbit(self, r=None, c=None):
    if r is None or c is None:
        A = set((row, col)
                for row in range(self.rows)
                for col in range(self.columns))
        S = set((s[0], s[1]) for s in self.snake)
        a = random.choice(list(A-S))
    else:
        a = (r, c)
    self.rabbit[0] = a[0]  # row
    self.rabbit[1] = a[1]  # col
    self.rabbit[2].position = (a[1] * self.sprite_w * self.sprite_zoom,
                               a[0] * self.sprite_h * self.sprite_zoom)
Update state and react to the user
Updating the state begins with computing remaining time to move the snake. If the snake should move, it will and update graphics. The snake wraps around the scene with modulo operation. At the beginning a new head is placed.
def update(self, dt):
    self.snake_move_t_rem -= dt
    if self.snake_move_t_rem <= 0:
        self.snake_move_t_rem = self.snake_move_t
        self.snake_dir = self.snake_dir_next
        row = self.snake[0][0]
        col = self.snake[0][1]
        if self.snake_dir == 'left':
            col -= 1    #  col = col - 1
        elif self.snake_dir == 'right':
            col += 1
        elif self.snake_dir == 'up':
            row += 1
        elif self.snake_dir == 'down':
            row -= 1

        row %= self.rows
        col %= self.columns
        head_img = self.images['head_'+ self.snake_dir]
        head_sprite = pyglet.sprite.Sprite(head_img)
        head_sprite.scale = self.sprite_zoom
        head_sprite.position = (col * self.sprite_w * self.sprite_zoom,
                                row * self.sprite_h * self.sprite_zoom)
        self.snake.insert(0, (row, col, self.snake_dir, head_sprite))
The part which used to be a head must have the image changed. Two options for straight line and eight options for turns.
        H = self.snake_dir  # head direction
        S = self.snake[1][2] # second snake part direction

        if H == S and (H == 'left' or H == 'right'):
            self.snake[1][3].image = self.images['horizontal']
        elif H == S and (H == 'down' or H == 'up'):
            self.snake[1][3].image = self.images['vertical']
        elif S == 'down':
            if H == 'left':
                self.snake[1][3].image = self.images['turn_4']
            else:  # right
                self.snake[1][3].image = self.images['turn_1']
        elif S == 'up':
            if H == 'left':
                self.snake[1][3].image = self.images['turn_3']
            else:  # right
                self.snake[1][3].image = self.images['turn_2']
        elif S == 'left':
            if H == 'up':
                self.snake[1][3].image = self.images['turn_1']
            else:  # down
                self.snake[1][3].image = self.images['turn_2']
        elif S == 'right':
            if H == 'up':
                self.snake[1][3].image = self.images['turn_4']
            else:  # down
                self.snake[1][3].image = self.images['turn_3']
When the rabbit is eaten as a “reward” we increase the speed and play the sound. If it is not eaten, the last part of snake is removed and appropriate tail image is set to the sprite – the direction must be used from the part before the tail itself.
        rabbit_eaten = row == self.rabbit[0] and col == self.rabbit[1]

        if not rabbit_eaten:
            self.snake.pop()   # podobne:   del self.snake[-1]
            tail = self.snake[-1]
            tail[3].image = self.images['tail_'+self.snake[-2][2]]
        else:  # rabbit_eaten
            self.snake_move_t -= 0.005
            self.place_rabbit()
            self.eat_sound.play()

        for s in self.snake[1:]:
            if row == s[0] and col == s[1]:
                self.die_sound.play()
                self.reset_snake()
                self.place_rabbit()
                self.snake_move_t_rem = 3
Finally we update FPS label and snake length label.
    self.frame_counter += 1
    self.one_second_counter += dt
    if self.one_second_counter >= 1:
        fps = self.frame_counter/self.one_second_counter
        self.fps_label.text = f'{fps:.2f} FPS'
        self.frame_counter = 0
        self.one_second_counter -= 1

    self.len_label.text = f'Length: {len(self.snake)}'
Only the arrow keys for changing snake directions are used. We forbid to change the direction to to direct opposite.
To show how mouse events are processed we added a little cheat; you can place the rabbit where you want with left mouse click! :-)
def on_key_press(self, symbol, modifiers):
    print('A key was pressed, code: ', symbol)
    if symbol == key.LEFT:
        if self.snake_dir != 'right':
            self.snake_dir_next = 'left'
    elif symbol == key.RIGHT:
        if self.snake_dir != 'left':
            self.snake_dir_next = 'right'
    elif symbol == key.UP:
        if self.snake_dir != 'down':
            self.snake_dir_next = 'up'
    elif symbol == key.DOWN:
        if self.snake_dir != 'up':
            self.snake_dir_next = 'down'

def on_mouse_press(self, x, y, b, mod):
    if b == mouse.LEFT:
        print('left mouse clicked at:', x, y)
        col = x // (self.sprite_w * self.sprite_zoom)
        row = y // (self.sprite_h * self.sprite_zoom)
        self.place_rabbit(row, col)
Finally we can draw everything.
def on_draw(self):
    self.main_window.clear() # vymazani okna
    # draw background
    for sprite in self.background_sprites:
       sprite.draw()

    # draw rabbit
    self.rabbit[2].draw()

    # draw snake
    for s in self.snake:
       s[3].draw()

    self.fps_label.draw()
    self.had_label.draw()
Full game (snake.py + assets)